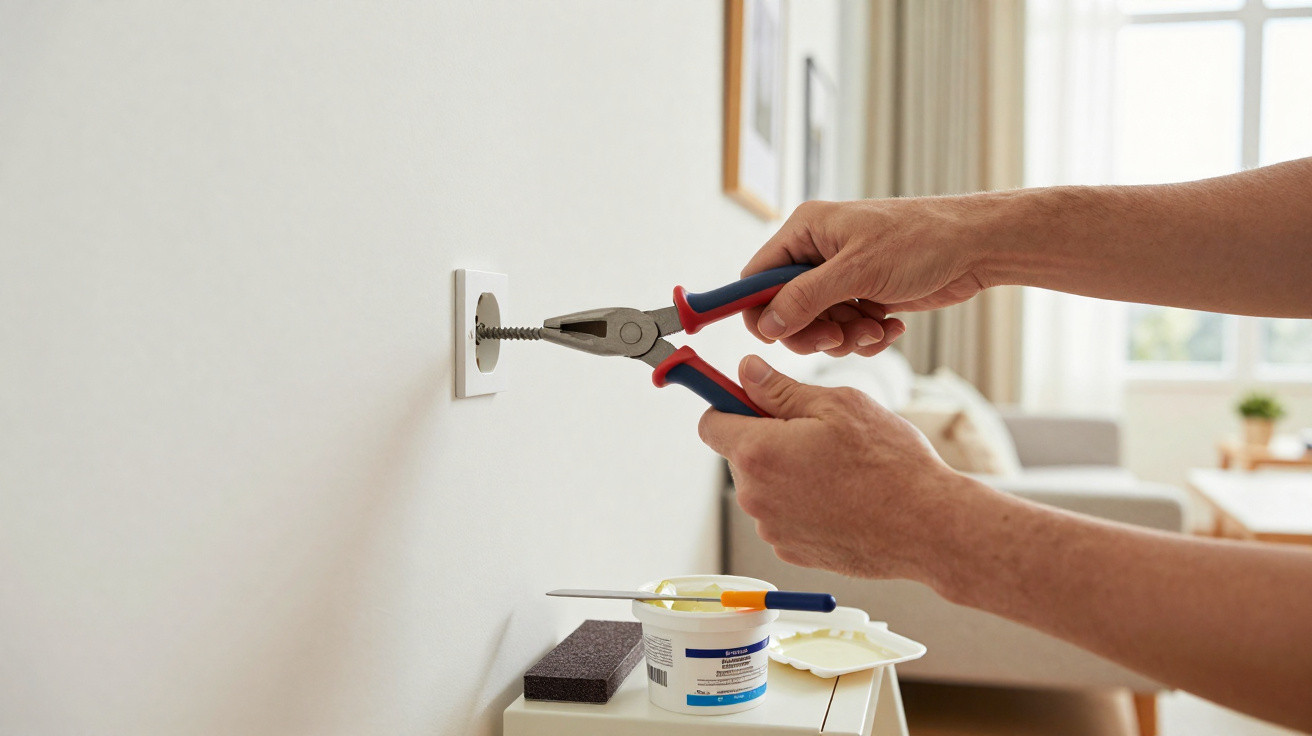
Anyone reorganising their home in January, moving pictures or repositioning shelves will know the issue: holes and old wall plugs remain where a decoration used to hang. Many people try to remove them quickly using brute force – only to turn an inconspicuous hole into a sizeable crater in the plaster. This can be avoided with the right technique and a few standard tools. The wall can then be restored without leaving visible marks.
Why brute force damages the wall
The situation is familiar: you reach for pliers, grip the protruding edge of the wall plug and pull as hard as possible. Initially, that may seem sensible – but structurally, it is the worst approach for the wall.
“Every wall plug is designed to resist being pulled out – it is meant to hold, not fall out.”
Whether it is a cavity fixing or a traditional plastic wall plug, both are engineered to withstand substantial pull-out forces. In masonry, small barbs lock the plug into the drilled hole; in plasterboard, a cavity fixing opens behind the board like a small umbrella. Pulling it straight out means the tool does not win: the leverage forces act on the plaster, the brittle surface breaks away, paint flakes off, and a neat hole becomes a damaged area several centimetres wide.
Anyone who wants to rearrange their home without hassle in future therefore needs a method that loosens the wall plug rather than tearing out the plaster with it.
The gentle method using a screw and flat-nose pliers
The good news is that clean removal does not require expensive specialist equipment. Most of what is needed will already be in the toolbox.
Which tools you actually need
- A screw with the same or a slightly smaller diameter than the original wall plug
- Flat-nose pliers or water pump pliers
- A screwdriver suitable for the chosen screw
- A flexible filling knife or decorator’s filling knife
- Filler or patching compound, either ready mixed in a tub or as a powder
- Fine-grit sandpaper, 120 to 180 grit
With this basic kit, almost any wall plug hole can be dealt with so that only minimal filling is needed afterwards.
Create a grip first, then lever it out
Old wall plugs are often brittle or have been cut flush with the wall. This is exactly why trying to pull them out directly with fingers or pliers usually fails: the plastic offers too little purchase. A better option is to create a sturdy metal extension.
Turn a screw only a few rotations into the wall plug, to a depth of around 1 to 2 centimetres. The screw should grip securely without expanding the plug further inside the masonry. This provides a solid point for the pliers to hold without putting pressure on the plaster.
The key movement: lever, do not pull
Now comes the central part of the technique: grip the screw head with the flat-nose pliers. Rather than pulling directly outwards, gently move the pliers back and forth. Small rocking movements from left to right, or slightly up and down, gradually release the wall plug from the surrounding material.
“The wall wins when you pull. You win when you lever gently.”
If it proves difficult, use the pliers as a small lever. Place a small piece of wood or cardboard between the pliers and the wall to prevent pressure marks. Then use the curved shape or pivot point of the pliers to lever the screw out millimetre by millimetre. The wall plug will slowly move outwards without large pieces of plaster breaking away.
The result is a relatively clean cylindrical hole, which is much easier to conceal than a blown-out hole with broken edges.
Filling professionally: how to make the hole truly invisible
Once the wall plug has been removed, the stage that determines the final appearance begins: filling and smoothing the hole. This is where most poor repairs occur, becoming obvious later in sunlight or under artificial lighting.
Choose the right filler
Small holes left by standard wall plugs, up to roughly 8 or 10 millimetres, can be sealed perfectly with ready-mixed filler from a tube or tub. It is soft, easy to spread and dries fairly quickly.
For larger voids, such as those left by heavy-duty fixings, it is worth using a powdered product mixed with water. These fillers set more firmly through a chemical reaction and shrink less as they dry. That reduces the risk of a visible dip forming later.
Fill correctly: slightly too much is better than too little
Do not simply apply the compound across the surface. Use the edge of the filling knife to press it firmly into the hole so that no air bubbles remain. Air can cause the repair to sink once it has dried. It is fine for the surface to stand slightly proud.
“A tiny bump is easy to sand away – a dip has to be filled again.”
Smooth it using a few criss-cross strokes: one horizontal pass and one vertical pass. This helps the new area follow the profile of the surrounding wall. Do not try to make it perfectly smooth on the first attempt. A small excess is intentional.
Final sanding and paint: the trick to an invisible repair
After drying for between 2 and 24 hours, depending on the product and the size of the hole, the area will usually feel slightly raised and somewhat rough. This is the point for the finishing work.
Achieve a perfect surface with fine sandpaper
Use fine-grit sandpaper and work with soft circular motions. Keep the pressure light so that no fresh scratches are created. Check the surface repeatedly with the flat of your hand.
Once there is no longer a noticeable edge and your hand moves evenly across the area, the surface is ready for paint. A few extra seconds of patience are particularly worthwhile on smooth walls, as any scratch will otherwise be mercilessly highlighted by the lighting later.
The right technique for an unobtrusive paint touch-up
Having the original paint colour stored in the cellar is an advantage. If not, choose a shade that is as close as possible. Most importantly, however, is the way the paint is applied.
- Lightly load the paint roller or brush; do not let it become saturated.
- First paint the filled area until it is fully covered.
- Then use the almost dry roller or brush to feather the paint beyond the edges.
This prevents a hard edge and instead creates a soft transition. Short, light movements produce a blend in which the new and existing coats visually merge. Once dry, the area will generally look uniform, with no visible patch on the wall.
Why this wall plug removal technique gives you more freedom when arranging your home
Knowing that wall plug holes can be removed cleanly makes planning a room feel less restrictive. The fear of leaving walls full of holes stops many people from making changes: the shelf remains in the wrong place for convenience, while the mirror stays where it has “always been”. The method described removes that obstacle.
Tenants in particular benefit, as a clean and visually tidy property is often required when moving out. Anyone who removes wall plugs in a controlled way, fills the holes neatly and matches the paint properly will be in a much better position at the handover and may avoid disputes with the property manager.
Common mistakes you can avoid
- Using toothpaste or soap as filler – both crumble and discolour.
- Simply hammering the wall plug deeper into the wall – this invisibly enlarges the hole and makes later repairs more difficult.
- Working with coarse sandpaper – it scratches the surrounding area more than it helps.
- Applying paint with sharp edges around the repair – the patch will immediately stand out.
Practical additions for common problem cases
What should you do with crumbly plaster or deteriorating plasterboard?
In older properties or where low-quality plasterboard has been used, the hole may begin to fray before the wall plug has even been removed. In this case, a two-stage approach helps: first remove loose particles with a finger or brush, then lightly dampen the edges. The filler will adhere much better and is less likely to break away.
If the hole has become noticeably larger than planned, a small piece of matching board can also be inserted into plasterboard and filled over. In normal household situations, however, a slightly thicker layer of filler is generally sufficient.
How many holes can still be concealed in one area?
Anyone taking down an old picture wall may sometimes be faced with a genuine landscape of wall plugs. From a technical perspective, even 10 or 15 holes can be filled, sanded and painted one after another. Visually, however, a heavily repaired section will eventually look patchy when different filled areas and paint shades meet.
In these cases, a different strategy is often worthwhile: close every hole properly, then repaint the entire area with a paint roller after sanding rather than touching up individual spots. This creates an even appearance, and former wall plug holes will no longer be visible, even in backlighting.
Anyone who remembers these few steps – insert the screw, lever gently, fill properly, sand finely and touch up the paint with care – no longer needs to worry about the condition of their walls the next time furniture is moved around. Repositioning a shelf or picture then becomes a matter of taste rather than a risk to the plaster.














Comments
No comments yet. Be the first to comment!
Leave a Comment