With one straightforward trick, this will not happen again.
Anyone planning to refresh a bathroom or kitchen in spring will soon come across wall tiles. They look excellent, but fitting them to a wall can be frustrating. Many DIYers know the problem: the tiles are perfectly aligned at first, then shortly afterwards they begin to slip, the joints shift and the pattern looks crooked. With proper preparation, the right adhesive and a small timber batten as an aid, this issue can be prevented for good.
Why wall tiles start slipping
The wrong tile adhesive or an incorrect consistency
In most cases, the issue is not the tiles but the adhesive. Adding too much water to powdered tile adhesive produces a mixture that is too runny. Although it spreads easily, it provides very little initial grab on a wall. The tile is therefore not properly held in the adhesive bed and starts to move downwards under its own weight.
The quantity of adhesive can also cause problems. Applying a layer that is far too thick may seem like a case of “more is better”. In reality, it tends to create a slippery film. Instead of being firmly bonded to the wall, the tile sits on a slick cushion, and gravity does the rest.
The ideal adhesive mixture resembles a workable, stable paste: it remains on the trowel without collapsing.
It is vital to follow the manufacturer's instructions precisely, including the mixing ratio, standing time and working time. Mixing it “by eye” often leads to slipping tiles and uneven joints.
Suitable mortar is essential
For wall tiles, a flexible thin-bed mortar rated C2 is recommended. This classification indicates improved tensile adhesion strength. It makes a noticeable difference on walls, where tiles are not supported in the same way as they are on a floor. Also check the stated “open time” on the bag: it should be at least 20 minutes.
This period is the time during which the adhesive remains sufficiently workable after application without losing its bonding strength. It allows the tiles to be aligned without immediately “sticking” in place or, conversely, sliding off altogether.
Levelling or tensioning systems are another useful aid. Self-clamping clips and wedges maintain even joint widths while mechanically securing the tile rows against one another. They stop a heavy tile from gradually pulling the tile below it downwards.
The timber batten trick for wall tiles: reliably stop every tile from slipping
Why you should never begin with the bottom row
Many DIYers start directly from the floor or kitchen worktop. This is where a common mistake lies: floors and worktops are rarely completely level. A difference of only one millimetre across the width of the wall will make the entire tiled surface run out of line. The higher you tile, the more obvious the misalignment becomes.
The smart approach is to deliberately begin with the second row. The first, bottom row is fitted last, once the rest of the surface is stable and correctly aligned.
How to fit the timber batten correctly
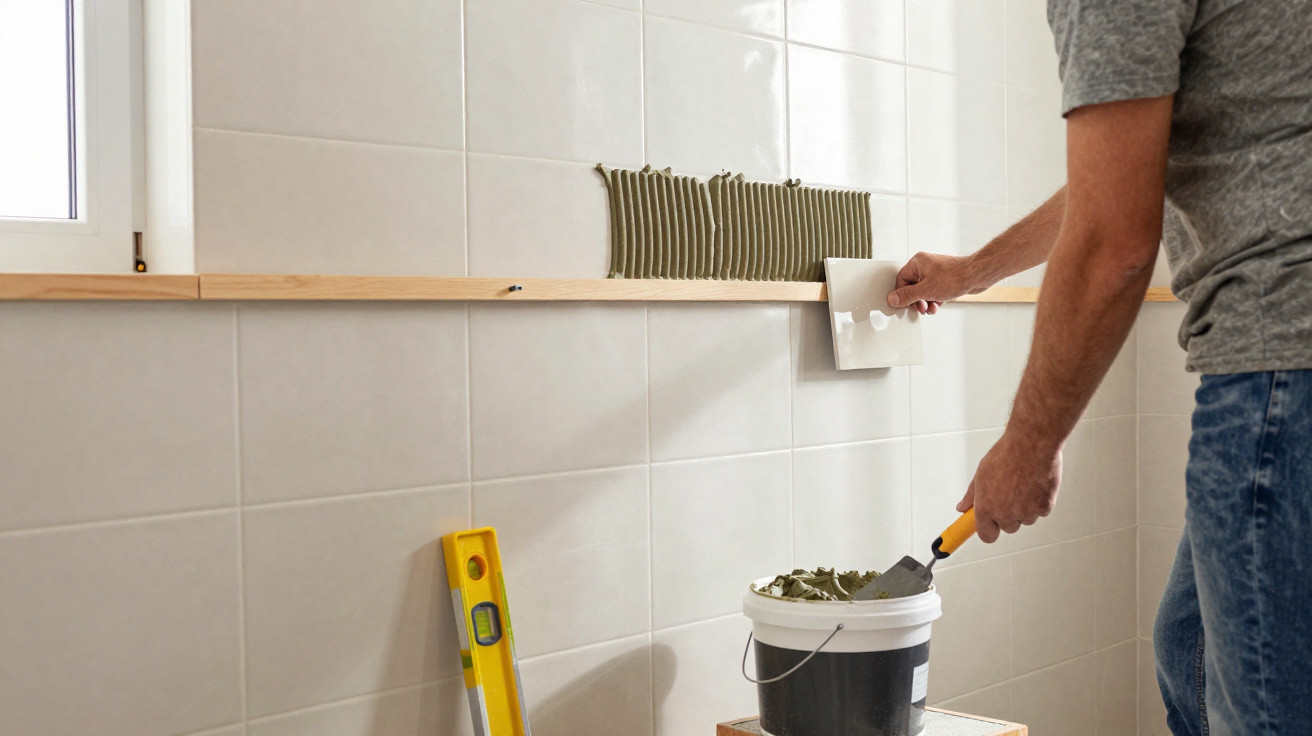
To stop the second row from hanging unsupported, use a very simple tool: a straight timber batten. It acts as a temporary support.
- Use a spirit level to mark a completely horizontal line on the wall.
- Secure the timber batten exactly along this line with screws.
- Set the height so that the lower edge of the second tile row will rest precisely on the batten.
When the tiles are fitted, they now sit on the batten. This prevents the rows from gradually sinking down. At the same time, it provides the perfect reference point for a completely straight joint line.
The timber batten acts like an invisible framework: it supports the weight of the tiles until the adhesive has fully cured.
Professional technique: double application for maximum grip
Why one layer of adhesive is often insufficient
The double-application method is particularly advisable for larger formats or heavy porcelain tiles. Adhesive is applied both to the wall and to the back of each tile. This helps prevent voids, which can weaken the bond and later cause cracks or hollow, rattling sounds.
Step by step: applying adhesive twice
For most wall tiles, a notched trowel with 6 mm notches is suitable. Proceed as follows:
- Spread adhesive evenly across the wall.
- Comb uniform ridges into it in one direction using the notched trowel.
- Apply a thin layer of adhesive to the back of the tile.
- Comb these ridges at right angles to those on the wall.
- Press the tile firmly into place and move it slightly back and forth until it is correctly seated.
The crossed ridge pattern creates suction when the tile is pressed on, similar to a suction cup. Air escapes at the sides and the adhesive spreads across the entire surface. This not only improves the bond, but also lowers the risk of a corner sounding hollow or coming loose later.
When to fit the bottom row
Patience pays off
Once the upper section of the wall has been tiled, many people want to continue immediately and remove the timber batten. This is often where the final major mistake occurs: if the batten is unscrewed too soon, adhesive that has not fully set can give way. The entire tiled area may shift slightly, joints can move and individual tiles can suddenly “settle”.
As a rule of thumb, wait at least 24 hours before removing the batten. This period is based on the requirements of EN 12004 for tile adhesive drying. In cool or very humid rooms, allowing an extra day can provide added security.
Now fit the bottom row
After the drying period, the timber batten can be removed without concern. The upper tiled area is now stable, and the tiles support their own weight. The first row can then be installed in the space left free, directly above the floor, shower tray or worktop.
This is often where precisely cut tiles are required to compensate for slight unevenness in the floor or angled edges. A tile cutter and cardboard templates make these cuts easier to plan. Careful work will produce a completely straight joint even where the floor is uneven.
Checklist: keeping your wall tiles securely in place
The key points for a neat, long-lasting result are easy to remember:
- Choose C2 tile adhesive with a sufficient open time.
- Mix the adhesive exactly as instructed; do not dilute it with too much water.
- Always start with a timber batten and begin at the second row.
- Use a levelling system and tile spacers to maintain even joints.
- Apply adhesive to both surfaces using a notched trowel, especially for large-format tiles.
- Allow at least 24 hours of drying time before removing the support.
Key terms and practical extra tips
What does C2 mean on tile adhesives?
The combination of letters and numbers on an adhesive bag can initially look like technical jargon. Put simply, “C” stands for cementitious adhesive, meaning the common powdered adhesive mixed with water. The “2” indicates higher tensile adhesion strength than the basic C1 class. For wall surfaces with larger-format tiles or areas exposed to moisture, C2 is the considerably safer choice.
Common mistakes you can avoid
A few simple working rules can prevent many problems:
- Never spread adhesive over too large an area at once, as it can form a skin and lose bonding strength.
- Regularly test with a tile whether the adhesive is still “smearing”, meaning that it is properly adhering to the back of the tile.
- Do not repeatedly remove and refit tiles after placing them, as this breaks down the adhesive structure.
- In wet rooms, always check that the adhesive is suitable for that environment.
Following these points and using the timber batten method takes much of the stress out of tiling a wall. A bathroom or kitchen renovation becomes far more manageable, while the likelihood of achieving a neatly tiled wall with a calm, even appearance rises significantly.











Comments
No comments yet. Be the first to comment!
Leave a Comment