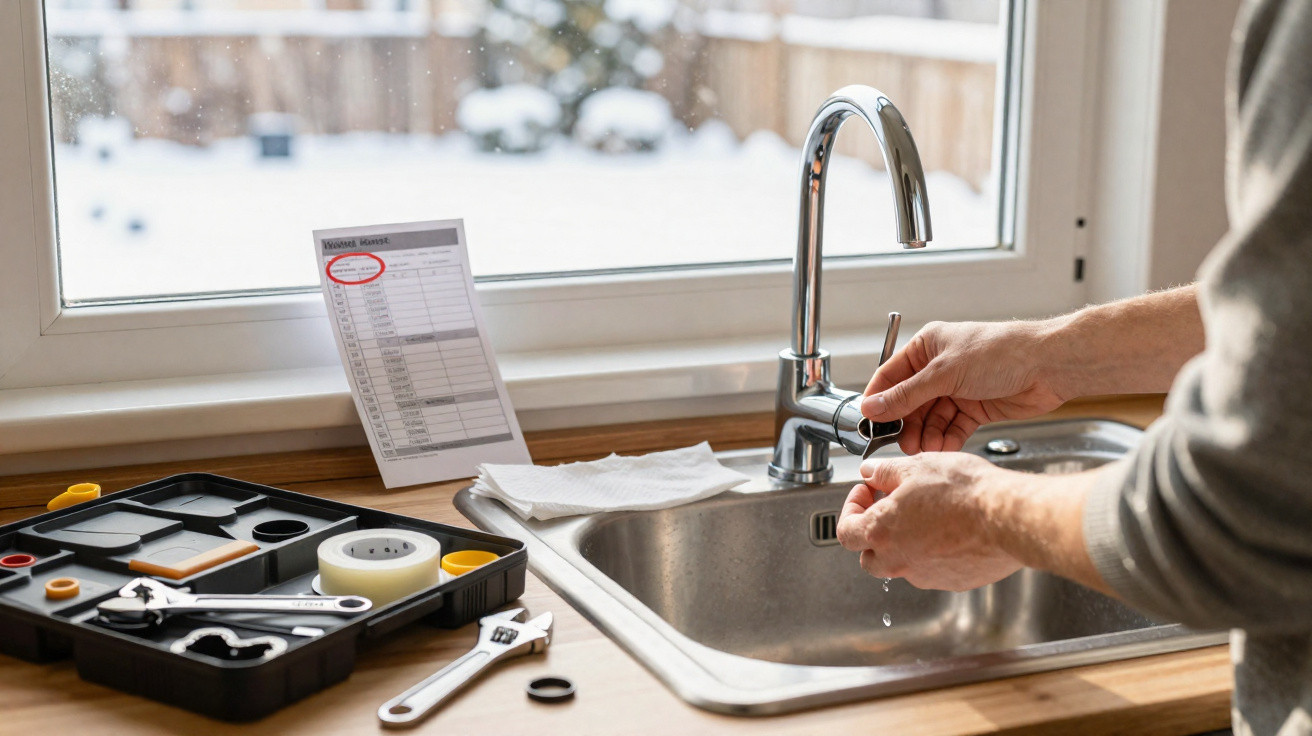
As households contend with heating bills and increasing water charges, the unobtrusive “drip, drip, drip” of a tap can steadily cost money, waste treated drinking water and even leave pipework vulnerable when the temperature falls.
When a January drip becomes a household budget issue
A slow leak in winter is often dismissed as mere background sound. The basin is not flooding, water pressure appears normal and everyday life is hectic, so it is easy to put the job off until “later”. Yet waiting can prove costly.
A tap leaking once per second can waste close to 100 litres of water a day – the volume of a full hot bath.
Over a full year, that uninterrupted drip can readily add up to 35 cubic metres. In a typical UK or US household, this means being charged for dozens of baths that nobody has used. Once wastewater charges or sewer fees are included, the cost rises further.
Winter adds another pressure point: heating costs are at their highest while water and sewer tariffs continue to increase. For households already feeling the strain of energy bills, fixing a preventable leak is a straightforward way to free up some room in the monthly budget.
What can a small winter leak actually cost?
Tariffs differ from one area to another, but the principle is consistent: a small leak may seem insignificant, while its yearly expense can catch many homeowners off guard.
| Leak rate | Water wasted per day | Water wasted per year |
|---|---|---|
| 1 drip / second | ≈ 100 litres | ≈ 35 m³ |
| 2 drips / second | ≈ 200 litres | ≈ 70 m³ |
| Fine trickle | ≈ 500–1,000 litres | ≈ 180–365 m³ |
Put realistic charges into the calculation. In many cities, combined water and sewer charges for 35 m³ of wasted water can produce a three-figure annual cost in pounds or dollars. At twice the leak rate, the added expense can begin to approach a month’s winter heating bill.
That spending covers water that has been pumped, filtered, disinfected and transported, only to be sent immediately down the drain. At a time of drought warnings and ageing infrastructure, such waste sits uneasily alongside the increasing drive to reduce household water use.
Frost can turn a harmless drip into a plumbing risk
The bill is not the only concern, because cold weather changes the equation. A modest leak from an outdoor tap, an unheated utility room, loft or garage can help create the condition pipes are most vulnerable to: ice plugs.
When water freezes in a confined pipe, it expands and can burst copper or plastic sections, sometimes behind walls or under floors.
Water moving slowly, or sitting trapped, in a leaking pipe cools more quickly than water in a pipe that drains completely or has a strong flow. This can form a localised frozen section that develops into a solid obstruction. Pressure then builds behind the plug until a section fails.
The consequences can be severe. A split pipe may saturate insulation, distort floors, mark ceilings and destroy stored items, while also requiring an emergency call-out at the coldest point of the year. Insurers regularly deal with winter claims caused by frozen pipes that started as small, neglected leaks.
Repairing a dripping tap in January is therefore more than a routine bit of household maintenance. It can be a preventive step against much more serious water damage when a cold snap arrives.
The winter repair kit: three essentials that can avoid a call-out
During freezing weather, plumbers are in demand and costly, yet many ordinary tap leaks do not require a complete professional repair. With care and a handful of inexpensive tools, simple faults can usually be handled without help.
An adjustable wrench and PTFE tape: a dependable winter pairing
There is no need for an extensive toolkit. For a standard compression or pillar tap, two tools generally do most of the work:
- An adjustable wrench that accommodates a range of nut sizes.
- PTFE thread-seal tape for tightening connections and preventing seepage.
The adjustable wrench allows tap heads and internal parts to be removed without needing to find the precise spanner. PTFE tape, the thin white strip available in DIY shops, closes minute gaps in threaded connections. Applied to the threads before reassembly, it helps form a watertight seal where two metal surfaces join.
A roll of PTFE tape costs less than a coffee and can stop leaks worth hundreds of pounds or dollars.
Having both items readily available lets you respond on a dark winter evening instead of waiting several days for an appointment in a plumber’s diary.
Isolating and draining water before the repair
Before any fitting is touched, the water supply must be dealt with. Simply turning off the leaking tap is not enough.
Begin by finding the home’s main stop valve, or the isolation valve for the relevant pipe. Close it completely. Next, open the dripping tap and, where possible, taps positioned lower in the system. Doing so drains the pipework and relieves pressure.
Working on a calm, empty pipe reduces the chance of an unexpected spray. It also provides an opportunity to check the tap body, nearby tiles and surrounding joints for fine cracks or old limescale traces that may indicate more extensive wear.
Inside the tap: the small component behind a winter drip
In most traditional two-handle taps, leaks can be traced to an inexpensive rubber washer or a ceramic cartridge that has gradually worn out. It no longer seals firmly against its seat, allowing water through as a continual drip.
Accessing the mechanism without scratches or stress
Opening up the tap can appear daunting, although the process normally follows a simple sequence. The top of the handle has a decorative cap or coloured insert. Carefully lift it with a small flat screwdriver or the end of a knife. Underneath is the screw that secures the handle.
After removing the handle, the top of the valve assembly is exposed. Here, the adjustable wrench comes into its own. Put a soft cloth between the wrench jaws and the chrome to prevent scuffs, then rotate the body anti-clockwise to release it.
Once the valve or cartridge has been removed, the deposits can be revealing: limescale crust, a band of debris or, on older fittings, rust. Soaking the component in warm water with white vinegar breaks down mineral deposits and leaves a cleaner surface for the replacement washer or cartridge to seal against.
Replacing the washer and applying PTFE tape: a 30‑minute drip fix
At the bottom of a traditional valve is a small rubber washer, held in position by a screw. If it is flattened, split or fraying, it cannot seal properly. Replacing it with a washer of the same size will often stop the leak immediately.
Most basic tap leaks vanish after replacing a worn washer and adding fresh PTFE tape on the threads during reassembly.
Before fitting the valve body back into the tap, wind PTFE tape around its threads in the tightening direction. This ensures that the tape settles into place rather than gathering up. Two or three wraps are generally enough. Smooth it gently with your fingers, refit the valve and tighten it lightly with the wrench.
Modern mixer taps using ceramic cartridges work on a similar principle. Rather than changing a washer, replace the cartridge as a complete component, selecting one that matches the brand or measurements. This is still relatively inexpensive compared with replacing the whole tap or arranging an emergency visit.
Testing, listening and carrying out a quick “paper check”
Once reassembled, the tap can be supplied with water again. Open the stop valve gradually to prevent pressure shocks in the pipework. Then operate the repaired tap several times, opening and closing it to settle the components.
It is then time to inspect the work. Dry the area using a towel and run a piece of kitchen paper around the tap base, its joints and beneath it where access permits.
If the paper stays dry after a minute or two, the new seal is doing its job and the winter drip has ended.
The first benefit is quiet. The intermittent sound that once carried through the home at night disappears, leaving the room still. It may seem a small change, but many households report a clear reduction in low-level annoyance once repetitive noises stop.
The next benefit becomes apparent later: the water meter moves more slowly and the bill no longer includes an unexplained increase attributed to “higher than average use”. Whether renting or owning, households can use that saving to ease other seasonal expenses, from heating fuel to festive costs.
Beyond the tap: other winter weak points worth checking
Fixing one leak can prompt a useful inspection of the rest of the property. Many problems have the same origin: minor faults left unresolved until cold weather makes them worse.
These checks work well alongside a winter tap repair:
- Run a hand along accessible pipes in lofts and garages to identify damp insulation or icy patches.
- Check for slow weeping around radiator valves and boiler connections.
- Ensure outdoor taps have covers or insulating sleeves fitted.
- Watch for unexplained water-meter movement when every tap and appliance is switched off.
These basic checks need no specialist knowledge. Their purpose is simply to improve the chance of spotting another gradual issue before it results in a flooded floor or collapsed ceiling during a cold spell.
There is an educational benefit too. When children and teenagers see a parent take apart a tap and discuss water consumption, they can develop a more tangible understanding of the cost of this unseen resource. That awareness often carries over into shorter showers, using full washing-machine loads and avoiding running taps while teeth are brushed or washing-up is done.
From a policy perspective, widespread use of small household repairs, pressure control and leak inspections could reduce strain on water networks under pressure. Utilities in some areas already provide discounts, free leak alarms or smart meters that identify unusual overnight use. Paired with straightforward measures such as repairing a winter tap leak, these tools offer households a practical means of reducing waste while safeguarding their finances.











Comments
No comments yet. Be the first to comment!
Leave a Comment