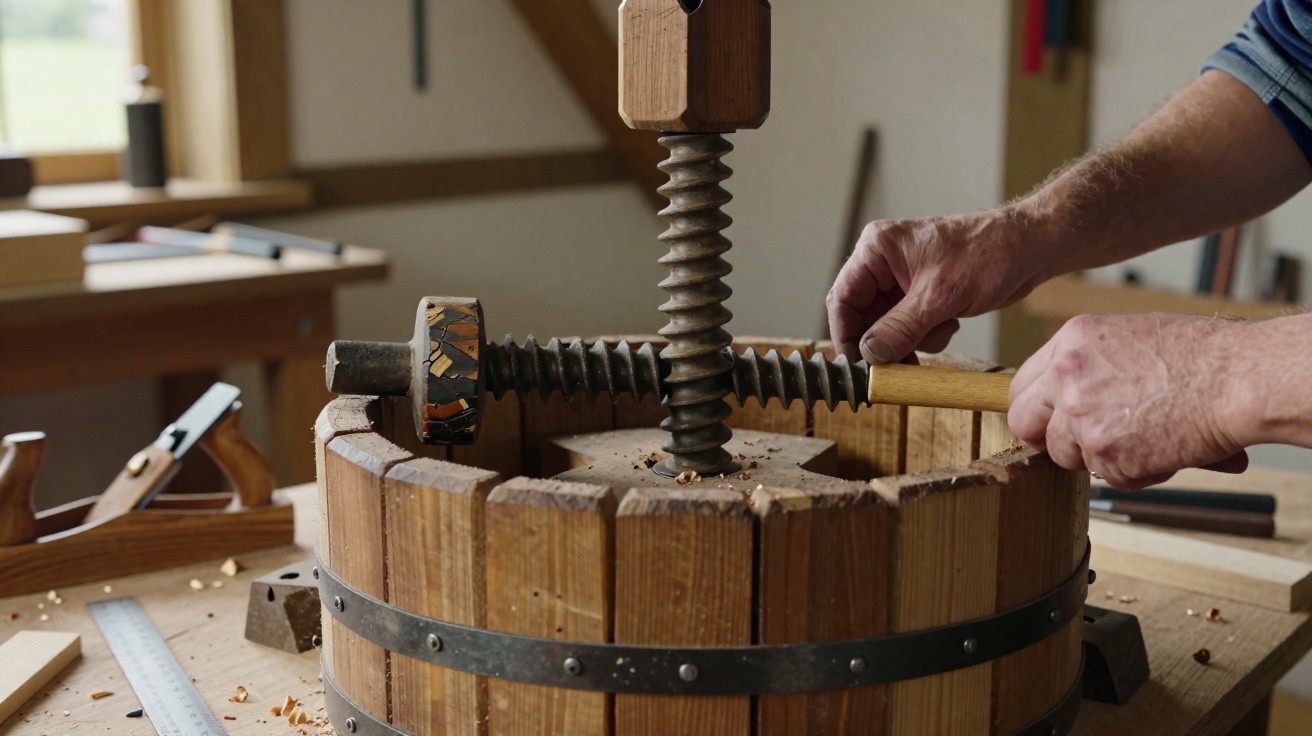
A historic cider press can look deceptively straightforward: a timber frame, a pressing bed and a huge central screw. Yet restoring one safely is far more than a carpentry job. The wooden screw and its matching nut must turn together under considerable force, and a small error in their shape can make the whole mechanism bind, split or fail.
Jean-Paul Isselin’s work with traditional press components in Aube, north-eastern France, offers a useful principle for anyone interested in heritage timberwork. When drawings and instructions have disappeared, the surviving object itself becomes the evidence. The practical trick is to study the mechanism before trying to reproduce its appearance.
A convincing restoration is not one that merely looks old. It is one that explains how the original object worked.
Why a wooden press screw is difficult to reproduce
Traditional cider and wine presses commonly used a large wooden screw to lower a pressing plate onto fruit. The screw was turned gradually, applying pressure through the frame and bed of the press.
The basic idea is simple, but the scale is not. A full-size screw may be several metres long and extremely heavy. It must remain reasonably true along its length, while its carved thread has to engage neatly with a matching wooden nut.
If the thread spacing changes, the grain is weak in a critical area or the nut does not match the screw, the mechanism may jam. Forcing it can damage both the new work and the historic press around it.
Typical challenges include:
- missing, decayed or distorted original components;
- limited reliable measurements;
- no surviving working drawings;
- difficulty finding suitably sized, well-seasoned timber;
- the need to balance historic appearance with safe mechanical operation.
The same issues can arise with old mill machinery, farm equipment and rural-life collections in the UK. A replacement part needs to be considered as part of a working system, not as an isolated piece of joinery.
Read the evidence before cutting timber
Traditional craft knowledge was often passed on in workshops rather than written down in manuals. That means a restoration may begin with fragments: an incomplete screw, wear marks on a frame, old photographs, tool marks or a comparable press elsewhere.
Isselin’s approach demonstrates the value of gathering these clues before committing to a full-size component. Images can help establish proportions, the likely position of handles and the direction of the thread. Surviving timber can show where the screw ran, where it bore against the frame and how far the pressing plate travelled.
However, photographs should never be treated as exact scale drawings. Perspective can distort length and width, particularly in pictures of large machinery.
Before altering an object, separate the evidence into categories:
- original structural features;
- later repairs and alterations;
- decorative details;
- damage caused by decay, movement or past misuse;
- marks that may reveal how the mechanism was operated.
Take high-quality photographs, make measured sketches and label every removed part. If the item belongs to a museum, listed building or formal collection, seek advice from an appropriate conservator before work begins.
Start with the whole mechanism
A wooden press screw cannot be designed properly in isolation. The screw, nut, pressing plate, bed, frame and bearings all affect one another. Even an accurately carved thread will not solve a press that is leaning, twisted or missing key load-bearing parts.
A sensible reconstruction sequence
Record the press in its existing condition
Photograph each face, including joints, fixing holes, wear patterns and damaged areas. Measure the travel of the pressing plate where this can be done without forcing the mechanism.Establish the central axis
Identify the line along which the screw needs to run. A screw that is slightly off-centre can place uneven strain on the nut and the press frame.Assess the thread form
Look for evidence of thread depth, spacing, direction and profile. Compare with similar documented presses where possible, but do not assume every example used identical proportions.Make trial pieces first
Small samples are invaluable. They allow the craftsperson to test the proposed thread profile and fit before committing to a large log.Fit gradually
Test engagement regularly as the screw and nut are shaped. Remove material in small amounts; a loose thread cannot be made tight again without further repair.Document the intervention
Keep notes on dimensions, timber species, repair methods and the date of work. Future custodians should be able to distinguish original material from replacement parts.
The best heritage repairs leave useful evidence behind rather than creating fresh uncertainty for the next person.
Choosing timber for a working component
Large threaded components need timber that is appropriate for both the task and the setting. Oak has often been used for substantial structural work, while elm was historically valued for its interlocking grain. That does not mean either species is automatically right for every press.
The important considerations are the condition, grain and dimensions of the individual piece of timber. A long screw cut from unsuitable wood may contain hidden weaknesses that only become apparent after the thread has been carved.
Check for:
- adequate diameter and usable length;
- grain that runs as consistently as possible along the proposed screw;
- knots, shakes, insect damage and decay pockets;
- checks or splits likely to interrupt the thread;
- moisture content suited to the building where the press will stand.
In Britain, many historic presses are kept in barns, outbuildings and unheated museums. These spaces can be damp in winter and dry out during warmer periods. Timber movement must be allowed for, particularly where closely fitted wooden threads meet.
Freshly felled wood and reclaimed timber both require careful assessment. Do not assume an old beam is dry, sound or suitable merely because it looks solid on the surface.
Accuracy begins with setting out
The defining skill in making a wooden screw is often the setting-out. The helical line must rise at a consistent rate around the timber from one end to the other. A small error repeated over several turns can become a major mismatch by the time the screw reaches the nut.
The process normally involves repeated reference marks around the cylinder, followed by controlled removal of waste and gradual shaping of the thread. Hand tools can offer excellent control, but they require patience and a clear sequence of checks.
A practical approach is to:
- mark reference lines clearly and protect them from being planed away too soon;
- rough out waste conservatively;
- check the thread at regular intervals rather than only at the end;
- keep the screw securely supported so it cannot roll;
- test the nut and screw without applying force.
A full-size screw is also a lifting and handling hazard. Heavy timber can roll unexpectedly, crush hands or overload improvised trestles.
Never work beneath a suspended log or component. Use lifting equipment rated for the load, stable chocks and supports, and competent assistance. If the press is intended to operate rather than remain a static display, obtain advice from a suitably qualified structural or mechanical professional.
Time is part of the craft
Work of this sort is slow because cutting is only one part of the job. Time is also needed for research, measuring, sourcing timber, making trial sections, preparing tools, fitting parts and recording the finished work.
That is why a heritage repair should not be judged solely by how quickly it makes an object look complete. A new component does not need artificial staining, false tool marks or fake age to belong in a historic setting. Honest new timber, carefully fitted and clearly documented, is generally more useful than a repair that disguises itself.
For owners and volunteers, the practical lesson is to allow adequate lead time. Rushing a specialist repair can result in wasted material and irreversible changes to the original object.
Common mistakes in historic timber machinery repairs
The wish to make an incomplete press look whole again can lead to avoidable errors.
- Copying a photograph without checking dimensions: old images are useful clues, not precise plans.
- Using whatever timber is available: large mechanical parts need sound material with suitable grain and section size.
- Treating every old mark as original: some scars may be later repairs, adaptations or accidental damage.
- Skipping trial pieces: small tests expose problems before a large log is cut.
- Forcing a tight screw to turn: this can crush thread edges, split timber and damage the frame.
- Sealing damp timber too early: trapped moisture can encourage movement and decay.
- Over-cleaning historic surfaces: aggressive sanding, blasting and strong chemicals can remove evidence of use and construction.
If cleaning is necessary, begin with the least invasive option and test it in an unobtrusive area. Wear suitable eye protection, gloves and respiratory protection when dealing with dust, old coatings or mould.
Never mix bleach with acidic cleaners, ammonia-based products or other household chemicals. Avoid using bleach on historic timber unless a conservation professional has advised it.
Passing on practical knowledge
The concern expressed in the title is understandable. Rare manual skills can disappear when there are too few opportunities to observe, practise and learn under supervision.
Anyone in the UK interested in heritage timberwork can begin by contacting local museums, historic mills, rural-life collections, preservation groups or woodworking associations. Courses in joinery, timber framing, green woodworking and conservation recording can provide useful foundations.
The most valuable habit is often the simplest: look closely before changing anything. Record what survives, test ideas at a small scale, use materials honestly and leave a clear account of the work. Whether the task is a giant cider-press screw or a modest repair to an old gate, that is how practical knowledge is most likely to be carried forward.















Comments
No comments yet. Be the first to comment!
Leave a Comment