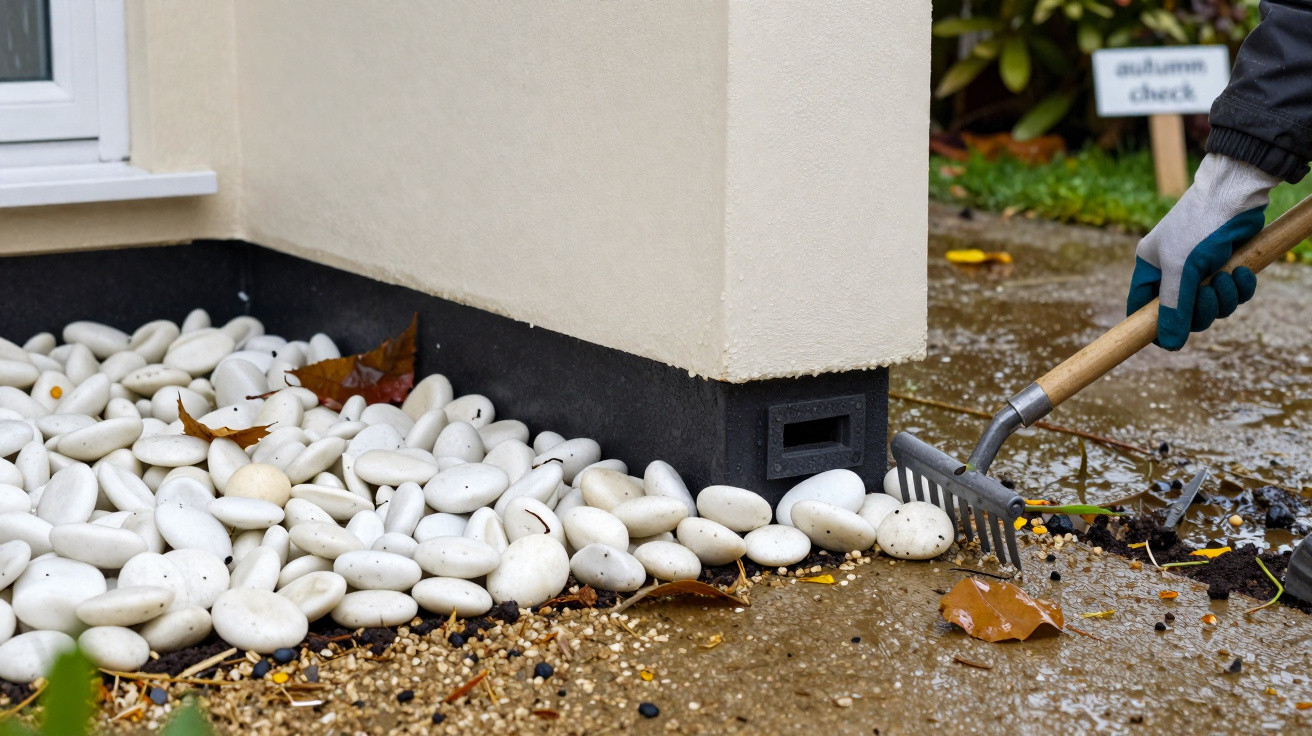
A strip of white pebbles can make the base of a house look smart in an afternoon. It disguises bare soil, gives a crisp edge to a path and makes weeds less obvious. But if the stones are built up against the wall, that tidy finish can hold debris and splash water where the building needs to stay clear and able to dry.
The useful trick is not to avoid gravel altogether. It is to keep the finished ground level well below the damp-proof course (DPC), leave air bricks and drainage openings unobstructed, and deal with rainwater before it reaches the border. Autumn is often when poor detailing becomes apparent: rain is frequent, leaf litter gathers quickly and walls have less time to dry between showers.
White stones can hide mud, but they must not hide the lowest part of the wall or bridge the damp-proof course.
Why a pebble border can become a problem
Pebbles do not cause damp by themselves. A low, free-draining gravel border can be a practical finish around a property. Trouble starts when decorative stone is topped up year after year, piled against render, or laid where water is already running towards the house.
Rain passes through gravel, but wet leaves, soil and dust gradually collect between the stones. This fine material can reduce drainage and leave the ground damp for longer. Stones can also increase rain splash on to the lower wall, particularly during heavy showers.
The risk is greater where the border sits beside:
- painted or rendered walls;
- exposed brickwork with weathered mortar;
- timber cladding;
- air bricks serving a suspended timber floor;
- weep holes above cavity trays or lintels;
- downpipes, gullies and service entries.
On a shaded side of a house, especially a north-facing wall, algae and staining may develop more readily because the area dries slowly. That is a reason to inspect the details, rather than simply covering the wall base with more gravel.
Keep the damp-proof course clear
Most modern homes have a DPC, often visible as a horizontal line in the brickwork. Standard construction detailing normally places it at least 150mm above the adjoining external ground level. This clearance helps reduce the risk of rain splash and ground moisture bypassing the barrier.
The important measurement is from the DPC to the highest finished surface beside the wall. That includes paving, soil, decking, bark, gravel and the top of any decorative stones.
On a rendered property, the DPC may be harder to spot. There may be a narrow brick course, a change in wall material or an exposed strip near the bottom of the render. If you cannot identify it with confidence, avoid raising levels against the wall and seek advice before making permanent changes.
Keep these features visible and clear:
- damp-proof courses and cavity trays;
- air bricks and sub-floor vents;
- weep holes over doors, windows and openings;
- the bottom edge of render or cladding;
- inspection chambers, gullies and drainage covers;
- pipes and cable entries.
Blocking air bricks is particularly risky in older homes with suspended timber floors. The ventilation below the floor is there to limit moisture build-up in the sub-floor void.
What to look for after a wet spell
A dark patch near floor level is not automatically ‘rising damp’. Leaking gutters, overflowing downpipes, failed pointing, cracked render, high paving, plumbing leaks and blocked drains can all cause similar-looking symptoms.
After sustained rain, inspect the outside of the wall for:
- persistent dark staining, algae or moss at the base;
- flaking masonry paint or loose render;
- soft, eroded or missing mortar;
- leaf litter and soil trapped in the pebbles;
- water sitting beside the wall;
- concealed air bricks or weep holes.
Indoors, peeling paint, salt deposits, low-level marks, lifting wallpaper and musty smells all warrant proper investigation. Do not assume a cosmetic treatment will fix the cause.
A wall need not be dry immediately after rain. It does need a clear route for water to drain away and a chance to dry afterwards.
Check the border before winter
Choose a dry day and inspect the full length of the wall. One elevation may be in much worse condition than another, particularly where a downpipe discharges or a path runs close to the building.
1. Check the finished height
Move a small patch of stones aside with a hand trowel, then use a tape measure to check the distance between the DPC and the top level of the gravel or soil.
Pay particular attention around door thresholds, steps and paths. These are common places for surfaces to have been raised over time.
2. Follow the rainwater route
Check gutters, hopper heads and downpipes during or shortly after rain if it is safe to do so. Water should not be spilling into a narrow gravel strip beside the wall.
Clear leaves from gullies and make sure paving falls away from the house. Gravel is not a substitute for functioning rainwater goods or correctly laid paving.
3. Look under the stones
Lift a small section of the border. Damp ground after rain is normal, but stagnant-smelling water, a thick layer of decaying leaves, compacted soil or builders’ rubble suggests that the border is not draining as intended.
Do not dig deeply next to the house in an attempt to create a drainage channel. Excavation close to foundations can expose services and may require professional advice.
4. Clear vents carefully
Brush loose stones and leaves away from air bricks and weep holes. Do not cover them with landscape fabric, plastic membrane or decorative aggregate.
Wear gloves when moving debris, particularly around drains and pipework. If an air brick is broken or heavily blocked, have it repaired rather than sealing it up.
How to improve the border without wasting the pebbles
You may be able to reuse most of the stone. The aim is to lower the finished level and stop the pebbles being banked against the wall.
1. Pull back excess stone
Rake pebbles away from the wall until the DPC, air bricks and wall base are easy to inspect. A narrow clear strip can be useful where the layout allows, but what matters most is maintaining adequate clearance below the DPC and keeping vents open.
Avoid leaving a deep trench next to the house. It can collect rainwater and direct it towards the wall.
2. Remove raised material
If old soil, rubble or repeated gravel top-ups have lifted the border, remove enough material to restore the correct level. Keep the resulting surface even and ensure water does not run back towards the building.
A shallow layer of coarse gravel can reduce mud splash, provided it remains below the DPC and does not bury the bottom of the wall.
3. Keep the rest of the border free-draining
Further from the house, a permeable geotextile may help separate soil from decorative aggregate and slow weed growth. It is not a waterproof membrane and will not solve a damp problem.
Rake out leaves in autumn before they break down into fine compost-like material. This also makes it easier to notice blocked drains, damaged pipework or burrowing activity.
4. Fix the source of water
Repair leaking gutter joints, clear gullies and redirect downpipe discharge to a suitable drainage point where necessary. A water butt can be useful where it is installed safely, has an overflow route and does not cause water to back up against the house.
For recurring pooling, saturated ground or suspected drainage defects, ask a competent drainage professional to assess the cause before installing a land drain.
Common mistakes that make matters worse
The fastest-looking solution is often the one that hides evidence of the real problem.
- Adding more pebbles every year. This raises the finished level and can eventually bridge the DPC.
- Packing stones tightly against render. Decorative gravel should not bury or trap moisture against the wall base.
- Covering air bricks for a neater edge. Ventilation matters more than a seamless finish.
- Using plastic sheeting beside the wall. It can obstruct drainage and create unwanted moisture traps.
- Painting over stains straight away. Staining is likely to return if rainwater defects or high levels remain.
- Calling every low-level damp mark rising damp. Rainwater goods, drainage, plumbing and external levels should all be checked.
Safety and when to seek help
Take care around gas pipes, electrical cables, drainage covers and buried services. Do not use strong chemicals near gullies or surface-water drains, and never mix bleach with acidic cleaners: dangerous gases can be produced.
If there is crumbling render, rotten timber, persistent internal mould, damaged brickwork, blocked vents or recurring damp marks, treat the pebble border as one possible factor rather than the complete diagnosis. A competent builder, independent damp surveyor or drainage specialist can help identify the source before costly work is commissioned.
For a practical autumn reset, pull stones away from the façade, make the DPC and vents visible, clear leaves and check where rainwater goes. A pebble border should frame the house neatly - not keep moisture against it.













Comments
No comments yet. Be the first to comment!
Leave a Comment