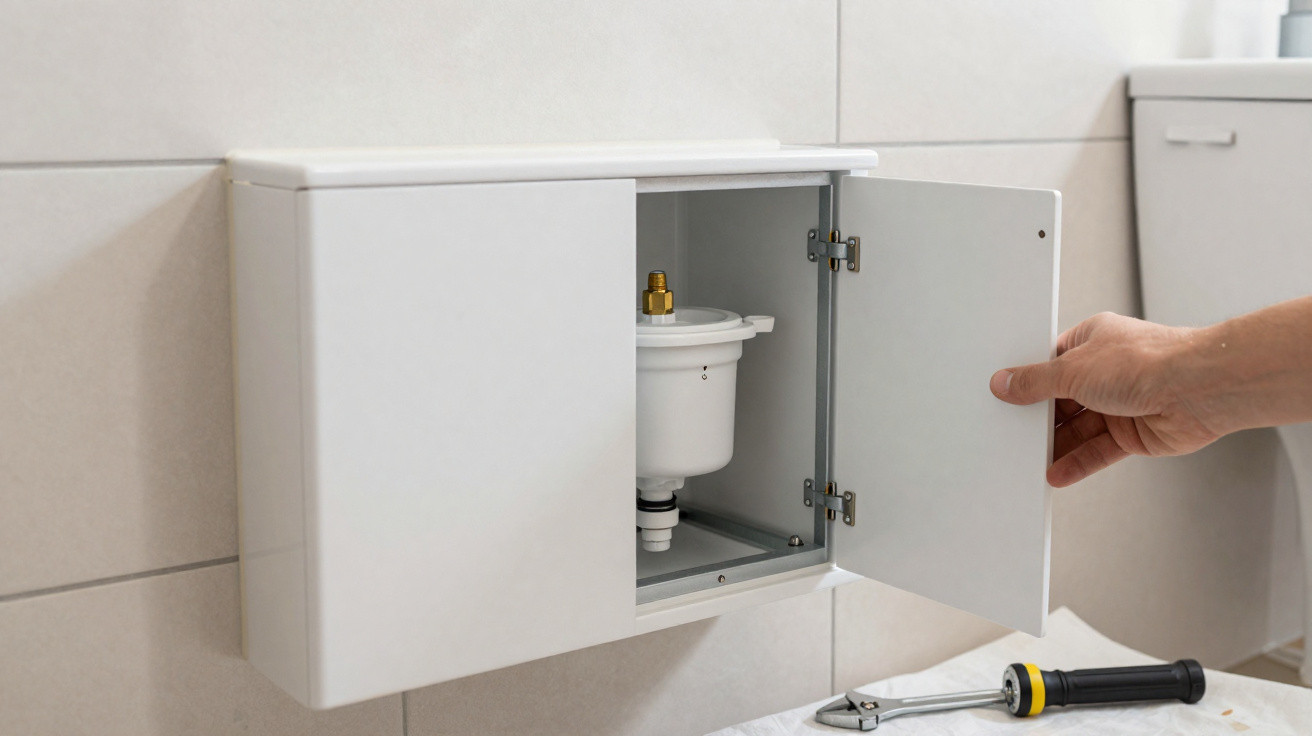
A wall-hung toilet can make a compact bathroom feel calmer and much easier to clean around. The costly mistake is not usually the toilet itself, but sealing its support frame inside a tiled box with no practical way to reach the plumbing later.
The key is to plan maintenance access before the boxing and tiles go on. The flush plate gives access to many cistern parts, but it cannot reach every pipe, seal or fixing. A well-positioned removable panel, ideally from a cupboard, side wall or room behind, can save a great deal of disruption if a repair is needed.
A concealed cistern should be out of sight, but it should never be impossible to maintain.
What is behind a wall-hung toilet
A wall-hung pan is fixed to a steel support frame, sometimes called a carrier frame. The frame is concealed within a purpose-built box or stud wall. Depending on the installation, the void may contain:
- the concealed cistern, fill valve and flush valve;
- an internal isolation valve;
- flush-actuation rods, cables or pneumatic tubes;
- the water supply connection;
- the flush pipe between the cistern and pan;
- the soil outlet connection and seals;
- frame fixings to the floor and wall.
These components are designed to be concealed, but they are not maintenance-free. Valve seals can wear, limescale can affect moving parts and pipe connections can occasionally need attention. A persistent running cistern, unexplained damp, staining, a musty smell or movement around the pan all deserve investigation.
The support frame carries the toilet, so it is not an area for casual alterations. The boxing needs to be rigid and suitable for a bathroom, while allowing proper access to components that may need servicing.
The flush plate is useful, but it is not universal access
Most concealed cisterns have a removable flush plate. Behind it is a service opening through which a plumber can often inspect or replace routine cistern components.
This may include:
- the fill valve;
- the flush valve or its seal;
- actuator parts;
- the cistern’s internal isolation valve, if fitted and positioned accordingly.
However, the opening is small and arrangements differ between models. It may not allow access to pipework beside the cistern, the soil connection, frame bolts or the rear of the boxing.
Before the wall is closed, ask the installer to remove the flush plate and show you what can actually be reached. Keep the installation instructions, model details, receipts and photographs of the pipework before it is covered. Those records can be extremely useful when ordering compatible parts or diagnosing a fault years later.
When a separate access panel makes sense
An inspection panel is most worthwhile when there is a service point outside the flush-plate opening. That might be an isolation valve, water connection, waste-pipe junction or another fitting likely to require attention.
It should not be added at random. The aim is to give enough space for a plumber to see the relevant components and use ordinary tools without removing tiles or breaking open the enclosure.
A panel can work particularly well when the frame backs on to:
- a vanity unit or cupboard;
- a boxed pipe run;
- an adjoining utility room or storage area;
- a service duct;
- a stud wall with an accessible room on the other side.
Access from the side or rear is often more discreet than a hatch in the tiled face directly behind the toilet. It can also make it easier to retain the bathroom’s waterproofing in splash-prone areas.
The most useful access panel is the one you forget is there until a repair makes it essential.
Plan access before the tiler starts
The best time to make these decisions is after the frame and plumbing are installed, but before boards, waterproofing and tiles are fitted.
1. Check the service opening
Ask what can be removed through the flush-plate opening, including the fill valve and flush mechanism. Check whether the isolation valve is accessible and can be operated without forcing it.
Do not assume every concealed cistern has the same arrangement. Service access and replacement parts vary by system.
2. Map the hidden services
Ask the installer to identify the water feed, flush pipe, waste connection and frame fixings. Take clear photographs before boarding begins, ideally with a tape measure visible in some images to show positions and dimensions.
Save the images somewhere obvious, rather than leaving them only on an old phone.
3. Agree a realistic panel location
The panel must be large enough to reach the intended components with a hand, torch and tools. Its exact size and location should be agreed by the plumber and bathroom fitter, rather than chosen after tiling is complete.
Possible finishes include a purpose-made inspection door in an adjacent wall, access through a cupboard back or a properly designed tiled removable panel.
4. Make sure it can be opened
A hatch behind a fixed basin, tightly fitted cabinet or heavy storage unit is not genuinely useful. Check the opening route while the bathroom layout is still flexible.
Choose materials suited to a bathroom
Bathrooms in the UK often experience condensation, intermittent heating and regular splashes. An access panel should be made and finished for a humid environment, not improvised from untreated timber or thin board.
Suitable options can include:
- purpose-made moisture-resistant plastic or powder-coated metal inspection doors;
- a tiled panel fitted within a proper removable-frame system;
- a moisture-resistant panel concealed in a cupboard or adjoining room;
- secure push-latch or magnetic systems designed for the panel’s weight and finish.
Do not rely on tile adhesive to hold a removable tiled section in place. It needs a suitable frame, secure fixings and a safe method of removal.
If the panel is within a shower enclosure or wet-room area, take particular care. Cutting through tanking or waterproofing without a proper detail can create a route for water into the wall. Seek advice from a competent bathroom installer before altering that area.
Adding access to an existing tiled box
A fully tiled enclosure does not automatically need to be demolished. A plumber and experienced bathroom fitter may be able to assess whether access can be created from the side, rear or an adjacent cupboard.
Start by:
- removing the flush plate to identify the cistern or frame model;
- finding photographs, paperwork and installer details;
- checking for an accessible room, cupboard or boxing on the other side of the wall;
- arranging an assessment if there is damp, persistent running water or movement;
- asking whether pipes and cables can be located before any cutting starts.
Do not cut into a boxed wall simply because it sounds hollow. It may contain water pipes, electrical cables, waste pipes or structural elements. A competent professional should establish what is behind the surface and isolate services where necessary.
If a seal between the cistern and pan is disturbed during a repair, use the correct replacement seal specified for that system rather than reusing an old compressed one.
Common mistakes to avoid
- Assuming the flush plate reaches everything. It is usually intended for routine cistern servicing, not every possible repair.
- Putting the isolation valve out of reach. Being able to stop the water quickly can limit damage.
- Making a decorative but tiny hatch. If a hand and tools cannot pass through it, it may not help.
- Cutting after tiling with no plan. This can damage tiles, pipes, cables and waterproofing.
- Using unsuitable board or poorly sealed edges. Materials can swell or deteriorate in a damp void.
- Forgetting the product details. Model numbers and installation instructions make future servicing far simpler.
- Treating the panel as ventilation. An access hatch should be properly fitted; it is not a substitute for suitable bathroom ventilation.
Safety and leak warning signs
Turn off the local isolation valve, or the main water supply if necessary, before attempting work on a concealed cistern. Do not force an old or stiff valve: it can fail or begin to leak when operated.
Never use a hammer, drill or power tool on the boxing until pipes and electrical cables have been located. If water is escaping, keep clear of nearby electrical fittings, stop the supply if it is safe to do so and contact a plumber promptly. Avoid using the toilet if you suspect a soil-pipe leak.
Aggressive drain chemicals will not cure a concealed leak, failing seal or weak flush. They can also create a hazard for anyone later working on the pipework.
A small decision that protects the bathroom
A wall-hung toilet can still deliver the clean, uncluttered look you want. The sensible approach is to make the concealed parts maintainable: retain the product information, keep the water shut-off accessible and plan a removable route to anything the flush plate cannot reach.
Before the tiler starts, ask one practical question: “If this connection leaks in ten years, how will it be repaired?” A clear answer now can prevent a far larger and messier job later.










Comments
No comments yet. Be the first to comment!
Leave a Comment