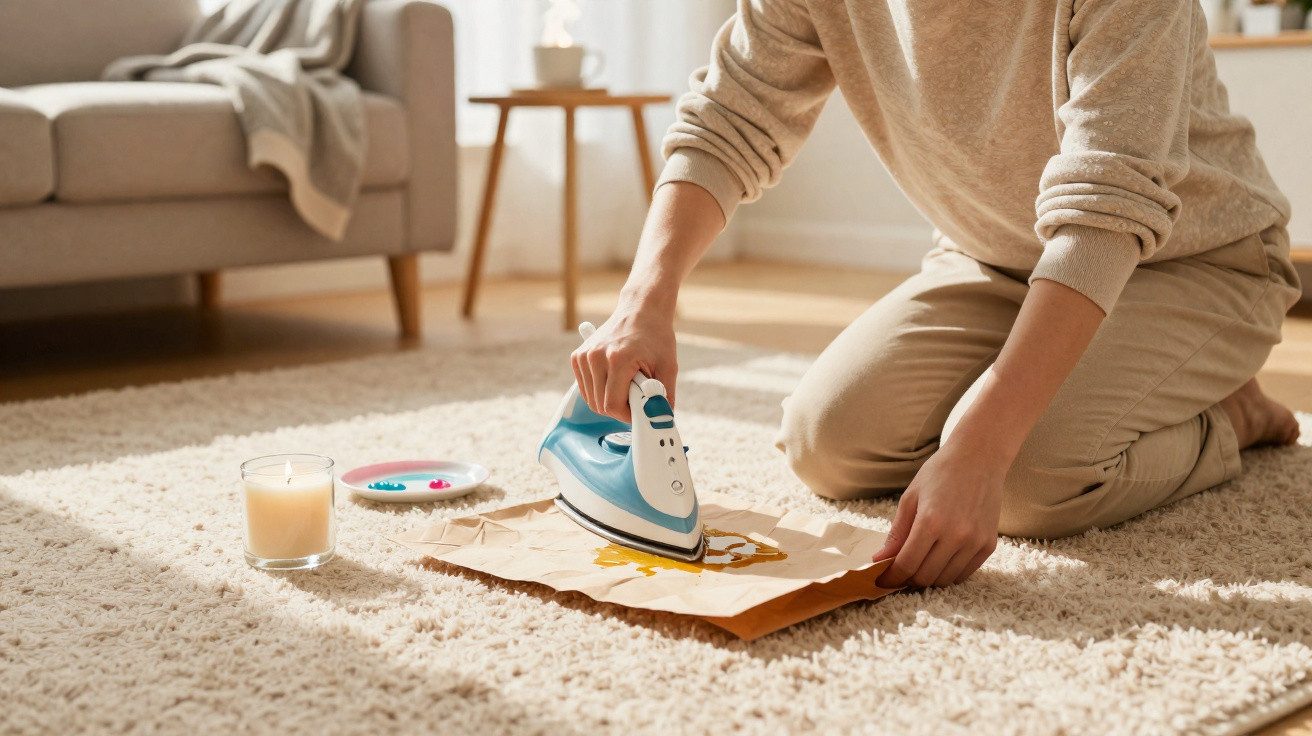
A spill can happen in seconds: one tilt, a gentle slosh, then a pale stream running over the edge and leaving a shiny blot on the carpet you promised to keep pristine. By morning, the patch may be hard, flaky and crunchy beneath your feet. It seems like a tiny, harmless mark, yet every time you walk past carrying a mug, it catches your eye like an unresolved secret.
I discovered the paper-bag-and-iron method after a cinnamon candle turned my living room into a small disaster zone. Seeing wax draw up into the paper as though it had been invited there is something you do not forget. Better still, the process is surprisingly satisfying.
A small household mishap you can put right
We have all watched a relaxing evening suddenly become evidence of poor judgement. Your mind leaps to replacing the carpet, requesting estimates, covering everything in protective sheeting and becoming the sort of person who never burns candles again. Yet, when you pick at the wax with a fingernail and it crumbles like a sugar topping, it becomes clear that the situation is not hopeless.
The moment you accept that the carpet is not destroyed but simply holding a reversible reminder, the problem stops feeling catastrophic and starts resembling a practical little project.
There is an unexpectedly calming order to the job. Avoid scrubbing first, as this only spreads softened wax and forces colour further into the fibres. Instead, allow the spill to set hard so that it breaks away rather than smearing. Gather ordinary household items: a brown paper shopping bag, a clean iron and a spoon that appears unlikely to judge your mistake. Within five minutes, the room may carry the faint scent of warm paper, reminiscent of school crafts and fresh chances.
I still remember the muted sound when the iron met the bag: a soft hush, almost a sigh. The cinnamon wax smelled unfairly festive for something so irritating. But when I lifted the paper and found a translucent oval where the wax had transferred, my tension eased. It was like finding a hidden hatch beneath a locked door.
Why a paper bag and iron remove candle wax from carpet
Wax responds well when its temperature is controlled. When cold, it becomes brittle enough to crack, scrape away and vacuum up. With only a little heat, it softens and seeks out a more absorbent place to settle. A paper bag provides that escape route: it is absorbent, lightly textured and cooler than the iron, encouraging the wax to move into it and remain there as it cools.
Carpet fibres all have their own tolerances. Wool can cope with a modest amount of heat, nylon is reasonably tough, while polypropylene may distort or even melt if it becomes too hot. This is why the iron setting matters more than confidence. Use LOW heat and no steam. Steam introduces water, and water combined with the perfume oils in scented candles can form a sticky emulsion that is more difficult to remove.
Treat the process as gentle encouragement rather than cooking. You are not ironing a shirt; you are guiding wax out of the carpet. Plain brown paper works well because it has no coating or glossy print, and it darkens visibly as it absorbs the wax. Work gradually, inspect frequently and move to a clean section whenever the paper becomes translucent.
Removing wax from carpet step by step
Set up the area
Wait until the wax has completely hardened. If you cannot wait, place a freezer pack or a bag of frozen peas over a tea towel on the affected spot for ten minutes. Once the wax is brittle, ease a blunt butter knife or the edge of a credit card beneath it. Lift it away in gentle flakes, as if collecting pastry crumbs.
Vacuum the area afterwards to remove fragments and loosened dirt. Dust is particularly helpful to wax when it comes to creating a stain, so clearing it away matters.
Rip a brown paper bag into flat pieces, allowing you to replace each sheet quickly. Do not use bags with printed branding or receipts, as heated ink can transfer to the carpet. If white kitchen roll is your only option, use thick, plain, unpatterned sheets and double them over. Plug in the iron, select low heat or a synthetic setting, and confirm that the steam function is switched off.
Apply heat and lift the wax
Place one sheet of paper bag over the wax, then rest the iron on it for two or three seconds. Lift it and inspect the paper. A shiny oval spreading through the sheet means the method is working. Shift the bag to a fresh section, reposition it and repeat. Keep the iron moving. This is a skimming motion rather than a parked one: a small amount of heat is enough, and the paper is there to absorb the wax.
Start at the outer edge of the mark and work towards the centre, preventing softened wax from travelling into clean fibres. Replace the paper as soon as it appears saturated. Gradually, the carpet will feel less rigid beneath your fingers as the stiff, sugar-glaze texture returns to normal pile.
The change is subtle until it suddenly is not. On the final pass, almost no wax transfers, and in daylight the repaired patch can look like the rest of the floor.
Clean and restore the pile
A faint shadow can occasionally remain, more recollection than residue. Dampen a clean white cloth with warm water and one drop of mild washing-up liquid. Blot the area by pressing, lifting and rotating the cloth; do not rub. Then use a second cloth lightly dampened with plain water to rinse.
Blot dry with kitchen roll, layering clean pieces until they lift away clean and the spot is largely dry. Finally, use the rounded back of a spoon to brush up the pile, helping the repaired section blend into the surrounding carpet.
Mistakes to avoid without blaming yourself
It is tempting to panic and use steam, but resist. Steam can push warm wax further into the fibres and may reactivate dyes that had been sitting quietly. It can also concentrate fragrance oils that are prone to clinging. Likewise, do not leave the iron in place while replying to a message: stay with the task, lift, inspect and repeat.
In reality, nobody handles every spill perfectly. Sometimes it is the wrong cloth, too much heat or a printed bag with a cheerful logo. Even so, a few careful choices will protect the carpet. Test on an inconspicuous spot first. A corner behind the sofa is ideal for a brief trial with the iron and paper, allowing you to see how the fibre reacts.
Rubbing is another common error, especially where coloured wax is concerned. It can distort the fibres and spread pigment outwards like a bruise. If pink or blue appears on the paper, that indicates dye transfer, so slow down and be patient. Lift rather than smear. Whenever you are unsure, switch to a clean piece of bag and allow the paper to take another quiet sip.
Different carpet types need different care
Wool is fairly forgiving, but only up to a point. It withstands mild heat and responds well to brushing afterwards, although it may cling stubbornly to dye. With wool, use a lower iron setting and shorter touches, allowing more time between passes for the paper to cool and absorb.
Nylon and polyester generally cope well if you remain gentle and never leave heat in one place for too long.
Looped carpets, including Berber styles, require additional care. Their loops can snag if scraped too enthusiastically, so rely more heavily on ice to harden the wax and let the vacuum collect the crumbs. With shaggy or deep-pile carpet, consider gravity. If you can lift an edge, place a clean towel beneath the affected section. Alternatively, after each quick touch with the iron, press the paper bag down with your palm so wax reaches the fibres touching the paper first.
Carpet colour also makes a difference. Dark carpet can conceal much of the problem, yet still reveal a waxy sheen even after a clear spill. Pale carpets show dye transfer more easily, so plan for an extra blotting stage when the candle was anything other than bone white. Patience is valuable here: several mild cycles are better than one dramatic burst of heat.
Coloured or scented candle wax
After removing the majority of the wax, check for remaining colour, such as a pale pink or inky halo. Take a clean white cloth and dampen one corner with 70% isopropyl alcohol. Blot from the outside inward, lifting the dye rather than encouraging it to spread. Turn the cloth as pigment transfers so you do not press it back into the carpet. Finish with a light blot using water to restore balance.
If scented-candle oils leave a dull patch or an odour that makes the room resemble a gift shop, prepare a bowl of warm water with a drop of washing-up liquid. Dab the area lightly, then rinse with plain water. Scatter a very light dusting of bicarbonate of soda over the dry patch and leave it for an hour before vacuuming, helping to reduce any remaining smell.
The key is patience: allow the dye to transfer onto the cloth, not further into the carpet. If a soot ring is responsible, a tiny amount of mild hydrogen peroxide solution on a cotton bud may remove it from light carpet. Always test this first in a concealed area.
Aftercare that makes the repair disappear
The difference between “cleaned” and “invisible” often comes down to the direction of the fibres. As carpet dries, pressing and blotting can leave it flattened. Lift the pile with the edge of a spoon or a soft brush, flicking it in the same direction as the surrounding nap. If you are unsure of that direction, stand back and observe how light moves across the room, then match the existing lay and sheen.
Dampness left in the underlay may later reveal itself as a musty patch, so allow the area plenty of air. A small fan, or even a hairdryer on a cool setting waved from a distance, will help complete the drying process. Place a folded towel over the spot, weigh it down with a book for half an hour and replace the towel once to draw out any final moisture.
When you next vacuum the whole room, make an extra-slow pass over the repaired area. The consistency of the vacuum pattern, like raked sand, helps the mark vanish into the rest of the carpet.
Why this modest success matters
Some household jobs are simply mechanical. This one feels a little like alchemy. With everyday objects-a bag, iron and spoon-you can turn a sticky accident into an unremarkable memory. It is a rescue that does not require specialist cleaners or a professional visit, only a few attentive minutes.
That is what stays with you: the discovery that your home may be more resilient than you thought.
There is a quiet satisfaction in watching the paper reveal the shape of the spill, like a miniature museum display of what went wrong. Then the bag goes into the bin, along with the uneasy feeling in your stomach, and the room returns to being a place you enjoy. It is ordinary work with a small touch of magic, which is my favourite kind of housework.
A simple ritual for the next spill
We do not stop burning candles; we simply become more prepared. Trim wicks to a quarter-inch so the flame remains controlled, keep jars away from table edges and put a coaster beneath pillar candles so melting wax cannot find an easy route to fabric. If spills happen regularly in your home, hurricane holders are more than decoration: their glass makes them useful guardians.
I now keep a folded paper bag beside the iron, as that combination has rescued more than one carpet and, on one occasion, a wool throw. Put a sticky note in the cupboard saying “NO STEAM” if your future self needs reminding.
If another accident happens, you will remember the hush of warm paper, the swift lift and the way a mess can leave when you provide the right route. The secret is not only the trick-although it is an effective one-but the feeling that you can improve the day with your own hands.















Comments
No comments yet. Be the first to comment!
Leave a Comment