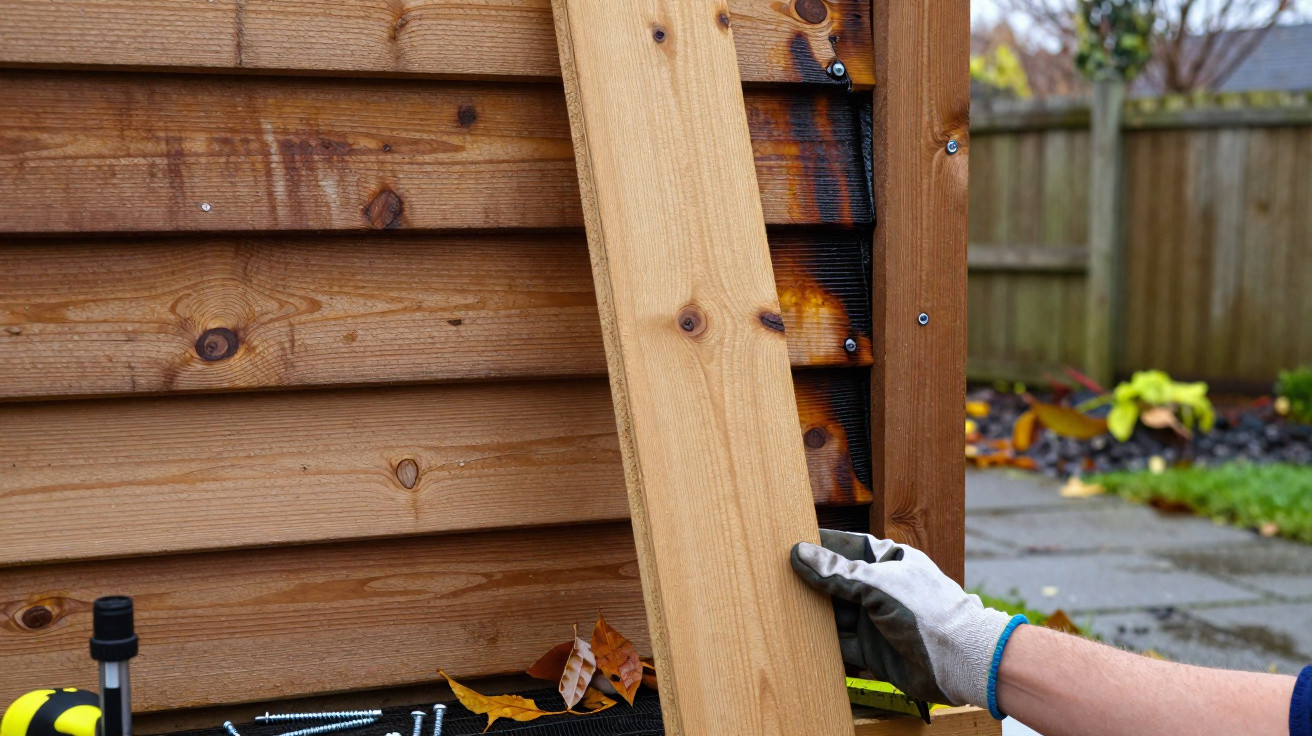
Timber cladding can transform a plain extension or tired rendered wall, adding warmth and texture without changing the whole building. Yet the boards you see are only the outer layer. Behind them, rainwater and moisture need somewhere to drain and a route to dry.
The key point is simple: timber cladding needs a correctly detailed, drained and ventilated cavity, plus a suitable breather membrane and careful detailing around edges and openings. Without this, a smart-looking façade can hide damp battens, mould growth and timber decay for years.
Timber cladding is not simply decorative boarding fixed to a wall. It is part of a rainscreen system, and every layer behind it matters.
What may be hiding behind the boards
Problems often become apparent only after several wet and cold seasons. The UK’s combination of persistent rain, wind-driven showers, high humidity and limited winter drying can be hard on exposed external walls.
If a board is removed, you might find:
- dark staining or visible mould on battens, sheathing or the rear of boards;
- a persistent musty smell;
- boards that have cupped, swollen, split or pulled away from fixings;
- rust marks or corroding fixings;
- softened battens or deteriorating timber-based boards;
- damp marks around window reveals, the wall base or junctions with roofs and balconies.
A dark patch does not automatically mean serious structural decay. Timber can discolour naturally, and surface mould is not enough on its own to identify the cause or extent of a problem. However, soft timber, crumbling board products, widespread staining or persistent dampness warrant inspection by a competent building professional.
Cladding is not expected to be completely waterproof. Rain can pass through open joints and be driven behind boards in windy weather. A well-designed wall accepts this and safely drains and dries the moisture.
The ventilated cavity: a small gap with an important job
The gap behind timber cladding is sometimes called an air gap, but it should not be a sealed void. It is a drainage and ventilation space between the back of the cladding and the weather-resisting layer behind it.
A cavity of about 19–20mm is often used as a practical minimum in UK cladding details. The appropriate size depends on the cladding profile, building height, exposure, location and the manufacturer’s instructions. It should be specified for the particular system, not reduced simply to save space.
For the cavity to work, it needs a clear path from bottom to top. This normally includes:
- an opening at the base to allow drainage and air intake;
- an outlet at high level so moist air can escape;
- suitable mesh to discourage insects while retaining drainage and airflow;
- battens arranged to maintain a vertical ventilation route;
- flashings, drips and window details that throw water outwards.
Vertical boards need particular attention. If they are mounted on horizontal battens alone, those battens can interrupt drainage and airflow. A counter-batten arrangement is commonly used to create a continuous vertical route behind the cladding.
A cavity is only useful if it remains open. Block it at the base, top or across the battens and it can become a damp trap.
Why the trouble can take years to show
Timber can cope with occasional wetting when it has a chance to dry. Damage becomes more likely when boards, battens and backing materials remain damp for prolonged periods.
A typical sequence is straightforward:
1. Rain reaches the rear of the boards
Water enters open joints, travels around board edges or is blown through gaps during storms. This is normal in many rainscreen cladding systems.
2. Water cannot drain away
A wall base set too close to paving, missing flashings, poorly formed junctions or accumulated debris can leave water sitting behind the cladding.
3. The cavity cannot ventilate
Blocked openings, compressed insulation, shallow battens or wrongly orientated battens can prevent the wall from drying after rain.
4. Timber stays damp for too long
Boards may move and coatings can fail. Battens, sheathing and fixings may then deteriorate, turning a hidden detail into a larger repair project.
This is why an installation can appear neat at handover yet reveal weaknesses after several winters. The process is gradual and largely concealed.
The layers of a robust cladding wall
The exact build-up should be designed for the building, particularly where insulation, existing walls and exposure conditions vary. In broad terms, a ventilated timber-cladding wall often includes:
- a suitable structural wall or backing board;
- insulation and vapour-control layers where required by the overall wall design;
- a vapour-permeable, weather-resistant breather membrane suitable for the system and exposure;
- treated battens and, where needed, counter-battens;
- a continuous drained and ventilated cavity;
- appropriately specified cavity barriers and fire-stopping measures;
- insect mesh that does not obstruct drainage;
- timber boards with suitable gaps, end detailing and corrosion-resistant fixings.
The breather membrane is an important secondary weather layer. It is not a replacement for a ventilated cavity, but it helps protect the wall behind from water that passes through the cladding while allowing water vapour to move outwards.
Fire safety and Building Regulations can be relevant, particularly for flats, taller buildings, boundary walls and more complex extensions. Requirements depend on the building and proposed work. Check whether Building Control approval, planning permission or compliance with a tested cladding system is needed before materials are ordered.
Questions to ask before installation
A quotation saying only “timber cladding to façade” is not enough. Ask for a drawing or written description of the wall build-up and key junctions.
Useful questions for your installer
What forms the drainage and ventilation cavity, and how deep will it be?
Ask how it stays open at both the bottom and top of the wall.Which breather membrane is proposed?
It should be suitable for external wall use and correctly lapped, taped and detailed around penetrations.How will the battens run?
For vertical boards, ask how a continuous vertical air path will be maintained.How are windows, corners, the wall base and roof junctions detailed?
These are common points for water to enter or become trapped.What timber and fixings will be used?
Timber should be stored and installed in line with the supplier’s guidance, allowing for seasonal movement. Stainless-steel fixings are commonly used outdoors to reduce corrosion and staining.How will the openings be protected without being sealed shut?
Mesh should not be clogged by mortar, paint, sealant, leaves or insulation.
Common mistakes that turn cladding into a damp trap
The costliest errors are often hidden behind a tidy finish.
- Fixing boards directly to the wall or onto inadequate battens.
- Sealing the bottom and top of the cavity completely with mastic or trim.
- Using horizontal battens behind vertical boards without counter-battens.
- Taking cladding too close to soil, decking or paving, where splashback is constant.
- Omitting a correctly lapped membrane behind open-jointed cladding.
- Blocking ventilation routes with debris, insulation, paint or unsuitable mesh.
- Using ordinary plated screws that are likely to corrode outdoors.
- Treating cavity barriers, ventilation and fire-stopping as if they are interchangeable.
- Assuming oil, stain or paint can compensate for a faulty wall build-up.
A fresh finish may improve weathered boards, but it cannot dry a trapped cavity or repair decayed battens.
If you suspect a problem behind existing cladding
Do not remove boards at random. Walls can contain electrical cables, insulation, membranes and cavity barriers, all of which can be damaged during an exploratory repair.
Start with an external check, ideally after rainfall. Look for bowed boards, damp marks at the base, rust staining, failed sealant at junctions and water collecting near the wall. Keep a note of where problems appear and whether they worsen after particular weather conditions.
A surveyor, experienced timber-cladding contractor or building-envelope specialist can make targeted inspection openings and distinguish a local fault, such as a failed flashing, from a wider problem with the wall build-up.
If mould is visible, avoid disturbing it unnecessarily or dry-brushing affected surfaces. Keep children and pets away from the work area, ventilate the area where possible and seek professional advice where growth is extensive or materials appear damp and degraded. Never mix bleach with acidic cleaners, ammonia-based products or other household chemicals, as dangerous gases can be released.
A practical route to durable timber cladding
Timber cladding can perform well in the UK climate and weather attractively, but only when it is treated as part of the wall rather than a cosmetic layer. A properly ventilated cavity, clear drainage route, suitable membrane and well-designed junctions are far easier to include from the start than to retrofit later.
If you are planning work this autumn or preparing for spring, ask for the full build-up in writing. Photograph each stage before the boards are fitted, retain product information and make sure future inspection remains possible. The best timber façade is not merely the one that looks good from the pavement; it is the one that can dry safely behind the boards.










Comments
No comments yet. Be the first to comment!
Leave a Comment